
10 Aug How to Install Aluminum Composite Panel Cladding Step by Step
Table of Contents
Are you ready to start your aluminium composite panel cladding installation? You can definitely take on this project, whether you’re new to DIY or have some experience. Safety is the top priority. Incidents like the Grenfell Tower fire highlight the importance of using the right materials. It’s essential to follow strict procedures to ensure everyone’s safety. When you install aluminium composite panels, your building can become more energy-efficient and durable. Keep in mind, the installation process works best when you’re careful and attentive. Always adhere to the manufacturer’s guidelines and regularly inspect your work. These step-by-step instructions will help your DIY aluminium composite panel cladding installation go smoothly and safely.
Tip: Always double-check your anchoring systems. Use fire-resistant panels to prevent serious accidents.
Key Takeaways
Always stay safe by wearing safety gear and using fire-resistant aluminum composite panels. Plan well by measuring your wall, cleaning it, and marking where panels will go before you start. Use the right tools and materials like fire-retardant panels, good fasteners, and strong sealants for a finish that lasts. Put up panels carefully by making sure they line up, are fastened tight, and sealed well to stop damage and save energy. Take care of your panels by cleaning them gently, checking for damage, and fixing problems fast so they look good for a long time.
Tools and Materials
Tools List
You want your installation to go smoothly, so having the right tools makes a big difference. Here’s what you’ll need:
Measuring tape and chalk line help you mark where each panel goes.
Spirit level and square keep your lines straight and your corners sharp.
Circular saw or panel cutter lets you cut panels to the right size.
Drill and screwdriver make fastening parts easy.
Rivet gun or screw gun helps you attach panels securely.
Caulking gun applies sealant to keep out water and dust.
Clamps and suction cups hold panels steady while you work.
Tip: Check all your tools before you start. This helps you work safely and saves time if you spot any problems early.
Materials Needed
Choosing the right materials keeps your project safe and looking great. For exterior cladding, you should use aluminum composite panels (ACM) with a fire-retardant core. Polyurethane cores are not safe and are banned in many places. Most panels have two aluminum sheets bonded to a fire-resistant core. You can pick from different finishes, like wood grain or metallic, to match your style. Look for panels rated A2 or B1 for fire safety. These panels are lightweight, strong, and help your building stay energy efficient.
Aluminum composite panels (fire-retardant core)
Mounting brackets and fasteners
Sealant (weatherproof and compatible with ACM)
Backer rods (for joints, if needed)
Edge trims and corner profiles
Safety Gear
Safety always comes first. You should wear gloves and goggles to protect your hands and eyes from sharp edges and flying debris. If you’re working at heights, use a safety harness and sturdy shoes. Always follow safety guidelines and use personal protective equipment (PPE) every time you cut, drill, or handle panels. Taking these steps keeps you safe and helps you focus on getting the job done right.
Note: Never skip safety gear, even for small tasks. One quick slip can lead to a serious injury.
Preparation
Measure and Plan
Before you start, grab your measuring tape and sketch out your project. You want to know exactly where each aluminium composite panel will go. Measure the height and width of your wall. Write down these numbers. Planning helps you avoid mistakes and saves you time later. Draw your layout on paper or use a computer tool if you like working digitally. Always measure twice before you cut anything. This step makes sure your installation goes smoothly and you don’t waste materials.
Pro tip: Think about obstacles like outlets or windows. Mark these spots on your plan so you don’t run into surprises during installation.
Surface Cleaning
You need proper surface preparation for the panels to stick well and last long. Start by removing dust, dirt, or grease from the wall. Use a mild detergent and warm water for general cleaning. For the final clean before installation, use a 70% isopropyl alcohol solution or ethyl alcohol with a lint-free cloth. Stay away from harsh chemicals, soaps with silicone, or anything abrasive. These can leave residues or damage the surface. If you want the best adhesion, lightly scuff the area with fine-grit sandpaper, then wipe it down with alcohol again. This step is key for a strong bond and a neat finish.
Marking and Layout
Now it’s time to mark where each aluminium composite panel will go. Use a chalk line or painter’s tape to outline the panel positions on the wall. Dry fit your panels before you install them. This means you place them on the wall without fastening, just to check the fit. Look for gaps or misalignments and fix them now. Make sure your frame is level and strong. A grid system helps keep your lines straight and your spacing even. Careful marking and layout make your installation look professional and last longer.
Remember: Double-check your marks and dry fit all panels before final attachment. This step helps you catch mistakes early.
Aluminum Composite Panel Installation
 Framing and AVB
 Framing and AVB
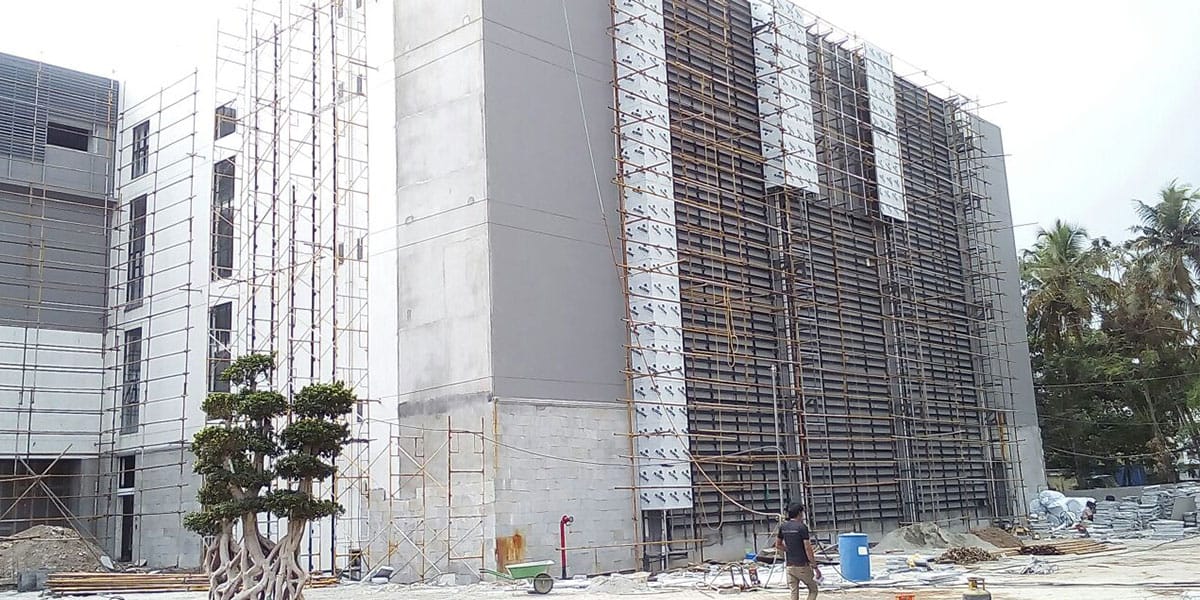
You want your aluminum composite panel cladding to last a long time. Start by building a strong frame. Most people use steel studs for this. Make sure the steel studs are at least 20-gauge. Place them no more than 24 inches apart. Put exterior gypsum sheathing on top. Use 1/2″ or 5/8″ thick sheets. Type X gypsum is best for fire safety. Keep the joints close together and stagger them. Overlap the sheathing at corners to make a neat edge. If any sheathing is damaged, replace it before moving on.
Next, put on the air and vapor barrier. You can use a liquid or sticky membrane. Clean and prime the wall first, especially at corners and joints. Cover the whole wall with the AVB. Make sure there are no gaps or wrinkles. Pay close attention around windows and doors. The air space behind the panels should be less than 2 inches. This step keeps water and air out. It also helps your building stay safe and energy efficient.
Tip: Use tested air barrier products like PERM-A-BARRIER®. Always check that your setup meets fire and building codes like NFPA 285 and ASTM standards.
Cut and Drill Panels
Cutting the panels is an important step. Use V-grooving bits made for aluminum composite panels. Pick a tip angle just over 90 degrees, like 110 degrees. This helps the panels fold neatly. Choose V-cutters with a small flat tip. This stops the paint from cracking when you bend the panels. For straight cuts, use a fine-tooth circular saw or a panel cutter. Spiral fluted carbide cutters are good for profile cuts. They keep the edges smooth.
When drilling holes, use sharp and clean bits. Pre-drill holes a little bigger than your fasteners. This lets the panels move when it gets hot or cold. Always keep holes at least 3/8 inch from the panel edges. This helps stop cracks and keeps the panels strong.
Note: Never use dull blades or bits. They can scratch the coating and ruin your panels.
Install Aluminum Composite Panels
Now you can start putting up the aluminum composite panels. Begin at the corners and work across the wall. Measure each spot carefully. Dry fit the panels before fastening them. This helps you check for gaps or if something does not line up. Use a mounting system that fits your project. Some systems use clips. Others use rails or brackets. Make sure the mounting system is level and secure.
When you mount the panels, follow the arrows on the protective film. This keeps the finish looking the same. Take off the film right before you finish installing the panel. If you leave it on too long, it can stick and leave marks.
Pro tip: Always install all panels in the same direction. This keeps the color and finish looking even.
Fastening and Alignment
Fastening is a big part of putting up the panels. Use fasteners that do not rust, like stainless screws or nylon rivets. Place fasteners every 8 inches along the edges. Keep them at least 1 inch from the panel edge. Do not tighten the screws too much. They should be snug but not crush the panel. Pre-drill holes to stop cracks and let the panels move.
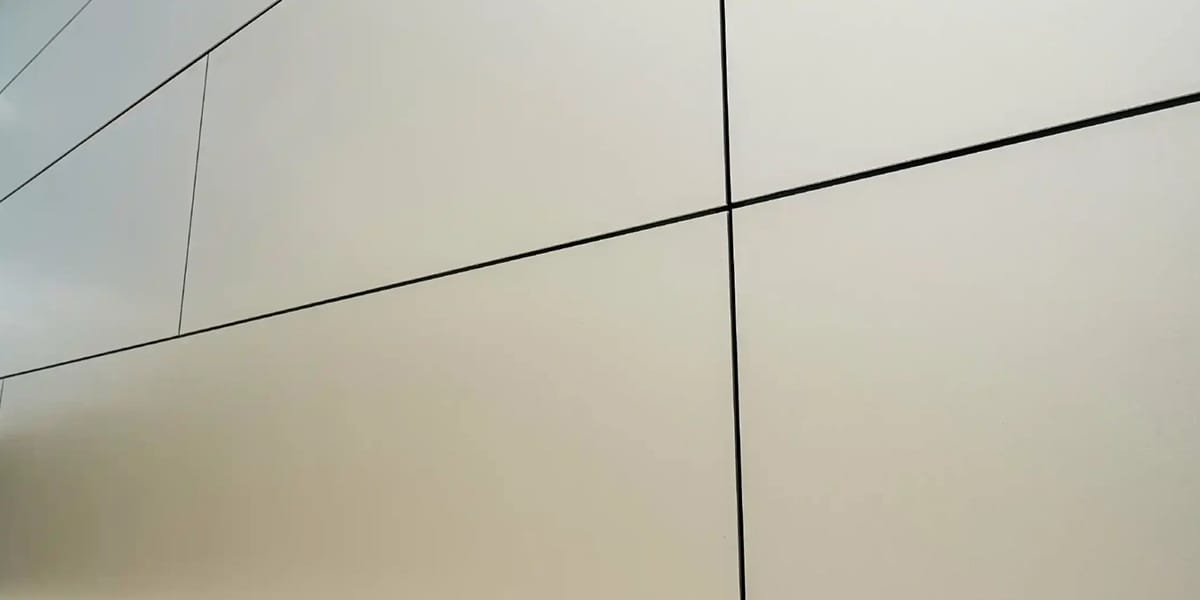
Alignment is very important. Use a level and chalk line to keep everything straight. Leave a gap of 3-5 mm between panels for expansion. For big panels, use the hanging method. This lets the panels move as the temperature changes. Fill the gaps with silicone-based sealant or use backer rods and sealant for wet joints.
Here is a quick look at common fastening mistakes and how to avoid them:
Fastening Mistake | Why It’s a Problem | How to Avoid / Solution |
|---|---|---|
Over-tightening screws | Can crack or bend the panel | Fasteners should be snug but not too tight |
Fasteners too close to edges | Can cause cracks or weak spots | Keep fasteners about 1″ from panel edges |
Skipping pre-drilling | Can damage the panel or make fastening uneven | Pre-drill bigger holes to let the panel move |
Using wrong fasteners | Can rust or not hold well | Use fasteners that do not rust, like nylon rivets or stainless screws |
Not enough fasteners | Panels can get loose or sag | Follow the spacing rules, usually every 16″ on center |
Remember: Always check your alignment as you go. Fix problems right away so they do not get worse later.
Sealing and Edge Treatment
Sealing the edges protects your aluminum composite panels from water and dirt. Use good silicone or polyurethane sealants made for building. These sealants keep water out and help your panels last longer. In tough or coastal areas, use a weather-resistant sealant for extra safety.
Put sealant on all seams, joints, and edges. Use a caulking gun to make a smooth line. For wide joints, add a backer rod before sealing. This helps the sealant stretch and move with the panels. Check the edges for gaps or missed spots. Seal every edge to keep your aluminum composite panel cladding looking good and working well.
Note: Check the sealant often and fix any cracks or gaps. This easy step keeps your panel installation strong for many years.
Attachment Methods
When you put up the panels, you can pick from a few ways to attach them. Each way has good and bad points. The three main choices are mechanical fasteners, adhesive systems, and mounting systems.
Mechanical Fasteners
Mechanical fasteners are things like screws, rivets, or bolts that hold the aluminum composite panels in place. They give strong support right away, so you do not have to wait for glue to dry. This is a good choice if you want to finish fast or might need to take off panels later. You can check and fix these fasteners easily. They work well for heavy panels and bad weather. Sometimes, you can see the fasteners on the wall, which might not look nice. You have to drill holes, so be careful not to hurt the panels.
Tip: Pick stainless steel or nylon fasteners. These do not rust and help your panels look nice.
Adhesive Systems
Adhesive systems use special glue to stick the panels to the wall. This gives a smooth look because you do not see screws or rivets. It works best if the wall is flat and clean. Press the panel down hard and follow the instructions for the best hold. The glue needs time to dry, but it helps stop heat from escaping and keeps water out.
Here is a table to help you compare:
Aspect | Advantages | Disadvantages |
|---|---|---|
Installation | Easy, no drilling needed | Needs flat, clean surfaces |
Finish | No fasteners showing, smooth look | Glue may get weak over time |
Thermal | Less heat escapes the wall | Must check glue strength sometimes |
Mounting Systems
Mounting systems use brackets or glue with rails or clips. These make it easier to put up panels and help them stand up to wind, rain, and temperature changes. In windy places, you can use systems like the AL13 Plank System or B&B Sheet Metal’s ACM 3000 RainScreen. These systems hide the fasteners, control moisture, and let panels move when it gets hot or cold. They also follow strict safety and building rules, so your panels stay safe.
Note: Pick a mounting system that fits your local weather and building needs. This helps your aluminum composite panels stay safe and look good.
Finishing and Maintenance
Cleaning After Installation
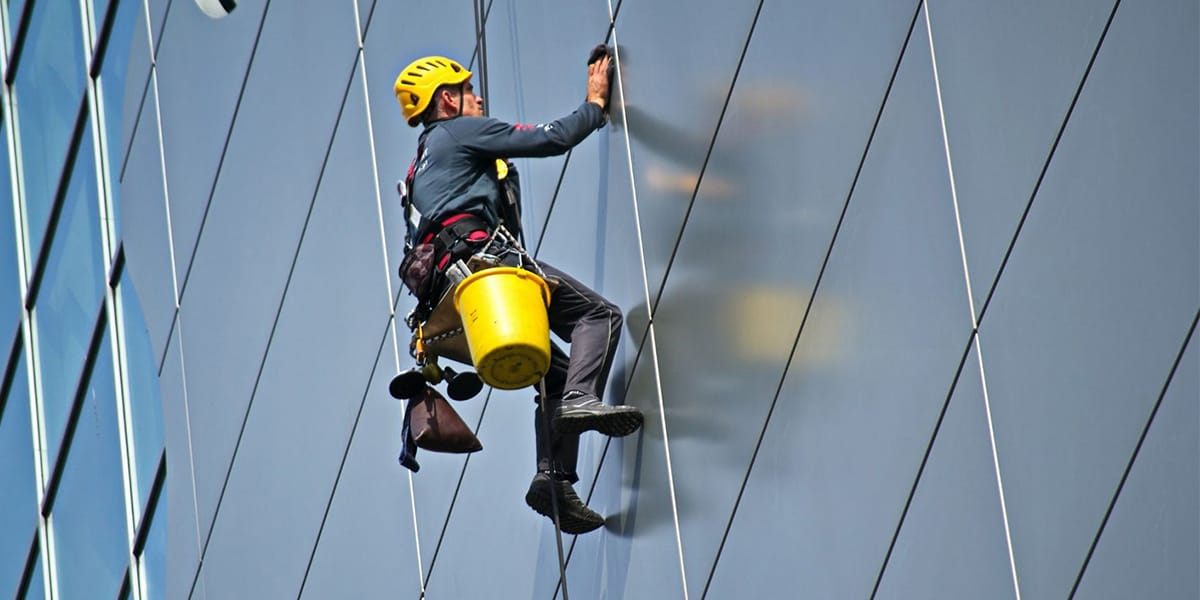 Cleaning After Installation
You just finished your aluminium composite panels installation, so now it’s time to clean up. If you want your panels to look great and last longer, follow these steps:
Rinse the panels gently with clean water to wash away loose dirt.
Mix a mild, pH-neutral soap with water. Use a soft cloth or sponge to wipe the surface in small circles.
For tough spots, try a diluted isopropyl alcohol solution or a citrus-based cleaner. Always use a soft cloth.
Stay away from harsh chemicals, bleach, or anything abrasive. These can scratch or damage the panels.
Rinse again with clean water to remove any soap or cleaner.
Dry the panels with a soft, lint-free cloth or let them air dry.
Tip: Keep the protective film on during installation to avoid scratches, and only remove it when you’re ready to clean.
Regular Maintenance
Keeping your aluminium composite panels looking sharp is easy if you stick to a schedule. Regular cleaning and inspections help prevent dirt buildup and damage. Here’s a simple table to guide you:
Maintenance Task | How Often | What To Do |
|---|---|---|
Water Rinsing | Use a hose and soft cloth | |
Soap Cleaning | As needed | Mild soap and sponge for dirty spots |
Surface Inspection | Once a year | Check for cracks, stains, or loose panels |
If you live in a rainy or dusty area, you might need to clean more often. Always avoid cleaning under strong sunlight, and never use harsh chemicals.
Troubleshooting
Sometimes, you might notice problems like warping, loose panels, or discoloration. Don’t worry—most issues have simple fixes:
Inspect the panels for loose fasteners or failed sealant.
Tighten or replace any loose screws or anchors.
Remove old, cracked sealant and apply new silicone or polyurethane sealant.
For warped or damaged panels, carefully remove and replace them. Use the right tools to avoid damaging nearby panels.
Always use corrosion-resistant fasteners and seal all joints well.
After repairs, check your work with a quick inspection to make sure everything is secure.
Note: If you see color fading, you might have used indoor panels outside. Always choose panels made for outdoor use to avoid this problem.
Careful planning and precise installation make your aluminum composite panel project last for decades. Here’s what you should always remember:
Inspect your site and pick the right panels for your needs.
Clean and prep the surface before you start.
Use proper tools and follow the layout closely.
Attach panels securely and seal every joint.
Regular cleaning and quick repairs keep your panels looking sharp.
With good care, your panels can last 20–30 years or more.
For tricky projects, don’t hesitate to call a pro.
Stay safe, follow the instructions, and enjoy your building’s fresh new look! 🏢
FAQ
How long does it take to install aluminum composite panels?
Most small projects take one to three days. Larger jobs may need a week or more. You work faster if you plan well and have all your tools ready.
Can I install aluminum composite panels by myself?
You can handle small projects alone. For big walls or high places, ask a friend to help. Two people make lifting and aligning panels much easier.
What should I do if a panel gets scratched?
Use a touch-up paint kit from the panel manufacturer. Clean the area first. Apply paint with a small brush. For deep scratches, you may need to replace the panel.
Are aluminum composite panels waterproof?
Aluminum composite panels resist water well. You must seal all joints and edges with the right sealant. This keeps water out and protects your wall.